Tao

Technology innovation

Monday, October 24, 2011

AAT convert module for other brand OSD


Skylark AAT convert module work with FY31/41 OSD
Skylark AAt convert module work with Nova OSD and Easy OSD

Skylark AAt convert module work with Range video OSD

Skylark AAt convert module work with EZOSD


AAT convert module for other brand OSD
It's very easy, Plug And Play.

Posted by Tao at 5:53 AM

Skylark Tiny OSD new connection diagram


Posted by Tao at 5:49 AM

Skylark Rock OSD

Features:
Contactless Current Sensor
Support 3S-12S battery
With 5V/12V selector switch for VTX and camera
Including barometer
180A current sensor
Skylark 10Hz GPS
Support Skylark Auto Antenna Tracker
Free firmware upgrade
Weight: 30g (w/ XT60 connector)
Posted by Tao at 5:47 AM

Skylark Trace OSD Handware version

Features
Easy to install and easy to use.
5V/12V filtered power for TX/Camera
PAL/NTSC compatible
80A current sensor RSSI
Auto detected | Auto "Setting Home"
With barometer
Skylark 10Hz GPS
Support Skylark Auto Antenna Tracker
Free firmware upgrade
Posted by Tao at 5:46 AM

Skylark 1000cd/m2 Ground Station


Posted by Tao at 5:46 AM

A quick way to test Tiny OSD

1. Connect OSD borad and PC USB port by usb cable 
2. Connect Monitor and OSD board(Video pin and GND)

Posted by Tao at 5:44 AM

Skylark Tiny OSD


Posted by Tao at 5:43 AM

Tiny OSD NTSC or PAL

Question

What in the world is that silly number above the Distance in the bottom center? The one with the arrows pointing left and right in odd fashion. It didn't appear to correlate to anything I was doing. I could be flying directly away from me in a straight line and that number and arrows would change from single to double to triple digits for no reason. Same for when I was flying back directly towards me.

Answer

But the distance display is not a problem from Skylark OSD.
Please check your monitor menu, and try to change the display mode as NTSC or PAL
Posted by Tao at 5:42 AM

Skylark Tiny OSD firmware V2.9

@skylark:
I use the Skylark Tiny OSD III in my quadcopter, turned on the summary with the software. I like the OSD, it's small and light weight :-)
Now when I'm hovering (to look around) the summary appears, and it's blocking my view :-( But I do not want to turn it off, I only want to see it after a landing. It looks like if the groundspeed is zero the summary comes up. Can this be changed in the firmware, so that when you're in the air (height not equal to height @ starting point or maybe even better: current > 1,5 A? then no summary is displayed)?

Keep up with the good work!
PS I have SW 2.8

Answer

Skylark has an updated firmware (2.9), the issue (summary) is solved now :-)
Posted by Tao at 5:40 AM

Decided to try the direct approach.

Skylark Current Sensor


Some customers need to solder Dean's connector for new current sensor, to avoid damaging the sensor, we recommend a soldering approach for your referance.

Posted by Tao at 5:36 AM

Review and testing the Tiny III OSD from wippo76

Review and testing the Tiny III OSD from wippo76

Posted by Tao at 5:34 AM

Hooking up the Tiny OSD lll from Randy Luna

Hooking up the Tiny OSD lll from Randy Luna
http://www.youtube.com/watch?v=8K3uM50qgpU


Posted by Tao at 5:33 AM

if the current sensor will read the 2s to show voltage and amps

I think what snow needs to know is if the current sensor will read the 2s to show voltage and amps.I would love to know as well.

@
Yes, it can support 1S-6S battery.
Posted by Tao at 12:24 AM

About ground loop.

@durangoflyer
Does the GRD wire on the video connection really need to be tied to the camera and tx 12V source? If the RSSI line coming in is powering the OSD from the Rx and the RX is on a UBEC pulling from the battery, then is there a ground loop?

I am using a single battery with a filter voltage regulator powering the 12v video gear. UBEC is pulling from the same battery.

@Skylark
No ground loop.
If all equipment use one battery, you can just connect one ground pin.

Posted by Tao at 12:23 AM

Skylark OSD Distance

@Moelich 
The Distance reading on the OSD... is that ground distance, or the distance of a straight line between Home and the plane?


@Skylark

Posted by Tao at 12:22 AM

Skylark Tiny OSD RSSI with the spektrum receiver.

Hi Skylark,

I have been doing some testing on the RSSI with the spektrum receiver. According to your instructions I have calibrated the RSSI with the aux channel (flaps on the DX6i) going from one side to the other and now I'm able to have on screen 99% of RSSI when the flaps channel is on and 0% when it's off (sounds obvious) so I'm pretty sure that the signal is recognized by the OSD, BUT it has no change at all. If the channel is on, it shows 99% all the time no matter the distance. Here's a video of the switch being toggled. Is there's something I can do ?
Thanks,

@Skylark
This can be easily explained. 
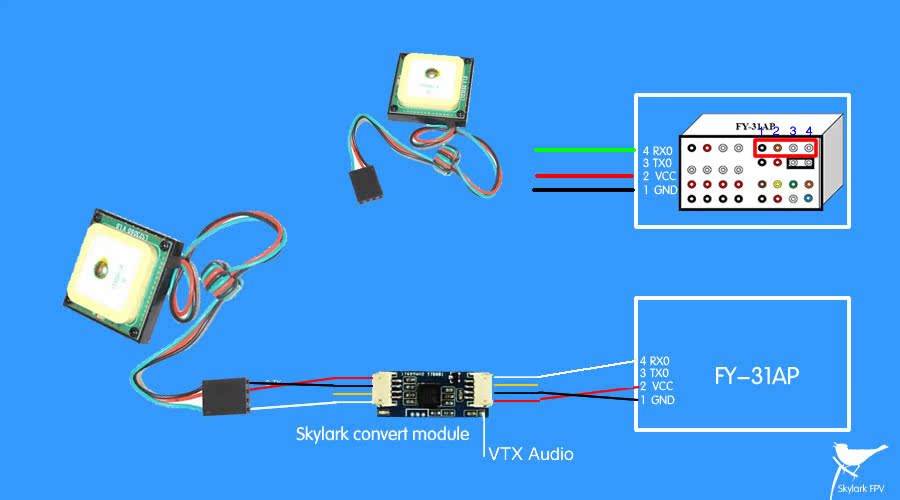
You connect a aux channel with RSSI pin, the OSD get aux signal, so OSD screen show the aux signal value, but it isn't realy RSSI. Every RC receiver channels will keep the fixed signal output(unless you push its stick), they won't change along with the distance.

As we have explained, the testing of aux channel is only to prove that OSD can deal with PWM signal, just it is used to demonstrate the feature.

If you want to get correct RSSI, please connect RSSI pin of RC receiver with OSD(RSSI Pin), then calibrate and test them.
Posted by Tao at 12:20 AM

A secret in Skylark Tiny OSD

3S-6S should theoretically work with the system


Love the final screen flashing until it gets ONFLY again - PERFECT!!!


@'distance home' 
The civilian GPS can be accurate to within 5-10 meters, so it has a few drift in measuring result.

@Trace Screen
Trace II/III is the firmware name, because the Trace II and III can use the same firmware, so the name follow 'Trace II SW XX' 

Love the new look - 


Posted by Tao at 12:19 AM

How to calibrate Digital RSSI

Before using the Digital RSSI, you need calibrate it.

A simple method to test Digital RSSI function

1. Connect OSD RSSI pin to one of channel your RC receiver.
2. Enable Digital RSSI by Skylark Configuration software
3. Click OSD->Calibrate ->RSSI Calibrate
4. Click "Start" button
5. Pushing remote control stick to Min and Max, the software will get the Min/Max value
6. Click "Stop" button
7. Reset OSD


I have followed all the steps:

1. Connect OSD RSSI pin to one of channel your RC receiver. DONE
2. Enable Digital RSSI by Skylark Configuration software DONE
3. Click OSD->Calibrate ->RSSI Calibrate DONE
4. Click "Start" button DONE (readings are MIN 26841 MAX 26968)
5. Pushing remote control stick to Min and Max, the software will get the Min/Max value (what stick ? throttle ?? nothing changes....)
6. Click "Stop" button DONE
7. Reset OSD DONE

On screen, the RSSI percentage reading is changing fast from 0 to 75% with no changes at different distances. If I turn the radio off, nothing happens.. Please HELP

The Stick correspond the channel what you connect as Testing RSSI in Step 1.
For example: You connect the RSSI pin to channel 1, you need push channel 1 stick

Of course, this test case only show that the new firmware support the Digital RSSI(PWM style) signal.

If you want to get real RSSI from your receiver, please follow the steps
1. Connect OSD RSSI pin to your RC receiver(PWM style) RSSI.
2. Enable Digital RSSI by Skylark Configuration software
3. Click OSD->Calibrate ->RSSI Calibrate
4. Click "Start" button
5. Remote Control power off
6. Click "Stop" button DONE
7. Reset OSD DONE
Posted by Tao at 12:18 AM

Skylark Tiny OSD RSSI Calibration

Skylark Tiny OSD RSSI Calibration
Only Percentage mode need the process
1. Make sure the RC receiver RSSI is connected to the OSD board. 
2. Use the Skylark USB Cable connect your computer and the GPS port of the Tiny OSD board
3. Remote Control power on
4. RC receiver power on
5. Run Configuration Software
6. Click OSD->Calibrate
7. Click "Start" button
8. Remote Control power off
9. Click "Stop" button
10. Remote Control power on
Posted by Tao at 12:17 AM

Skylark New Current Sensor


When some people reported a current sensor problem, Skylark had been confirming whether it was a design problem and wait more feedback. Made our felt what doubts was, only some of Tiny II have the problem, but the Tiny Ⅰ and Tiny II use the same design. 

Finally, we found that the problem could result from a faulty amplifier, not circuit design problem. We had contacted our supplier to replace the amplifier as of last month.
In this process, we developed a new current sensor to meet customers requirement. We sent out some samples to customer and got a good feedback.

Now both current sensor are all available, everybody can accord to yourself demand to determine the type of current sensor.

Skylark New Current Sensor

Posted by Tao at 12:15 AM

Skylark Dianmu OSD RSSI pin

The RSSI is the upper pin.


Calibration

Please enter into OSD Menu

OSD->Calibrate->RSSI

1. Select RSSI by Switch(Channel 3)
2. Switch(Channel 4) up or down, the RSSI value will blink.
3. Make you RSSI value, max and min
4. Switch(Channel 4) up or down, the RSSI value will stop blink and save the value
5. Switch(Channel 3) up or down, return the flying mode.


No change the value by your hand.
Just keep the RC control power ON / Off
Or 
Keeps RC control near / away from RC receiver

The OSD will detect the MAX and MIN value automatically.

Disconnect RSSI pin from OSD
Replace
Turn off the RC power

Please enter into OSD Menu

OSD->Calibrate->RSSI

1. Select RSSI by Switch(Channel 3)
2. Switch(Channel 4) up or down, the RSSI value will blink.
3. Connect/Disconnect RSSI pin with OSD, the OSD will detect the MAX and MIN(0) value automatically.
4. Switch(Channel 4) up or down, the RSSI value will stop blink and save the value
5. Switch(Channel 3) up or down, return the flying mode.


Posted by Tao at 12:14 AM

xRotor Spider Quad frame with Skylark Tiny OSD

I have finished the integration testing of my new SkyLark Tiny II OSD -- I am really liking it. I hope to get some full flights this next week. I have GPS, current, and RSSI from the FrSky Rx.

I have placed it on my xRotor Spider Quad frame.


Posted by Tao at 12:13 AM

TX GND pin/Camera GND pin/OSD GND pin are connected together

1、Please make sure that TX GND pin/Camera GND pin/OSD GND pin are connected together
2、If the GPS elevation exit some drift before you flight, please reset the OSD to fix it.
Posted by Tao at 12:12 AM

OSD standard screen degree layout for direction home

@aeryck 
One thing I'd like to see added to the firmware is the addition of a heading display. Currently the "Home" indicator at the bottom is great to get you back home, but I'd also like an indicator (either a compass figure or a heading in degrees) of which way I'm currently travelling. It probably wouldn't be too hard to implement, as it's already doing the math to figure out which direction Home is.

@Reverand Blue Chip
At first I thought the same thing - then I realized what the standard screen did - it provides Lat/Lon - but also gives you a nice degree layout for direction home - for instance left 90 means if I turn 90 degrees to the left - that's where home is.

True, but again, that just references where home is. I'd like a display that tells me which direction I am going. =] Let's say I survey something in google earth and find a takeoff/landing spot and want to fly to a point that's 2 miles NE of my landing site, I'd like a compass/heading feature to tell me when I'm flying NE instead of having to rely on geographical landmarks, which aren't always helpful especially in unfamiliar territory.

Posted by Tao at 12:09 AM

Sunday, October 23, 2011

Skylark AAT Test Tool


1、Connect your FPV equipment and power on AAT
OSD - TX ---- RX-Skylark AAT
2、Connect PC with Trace OSD by USB cable 
3、Run Skylark AAT.exe
4、Select the correct com port what USB cable use, and click the 'Connect' button.
5、Click 'Reset OSD' button,then waiting for Trace OSD get 'Home' position
6、Click 'Tracking' button
7、Check out the status of your AAT 
Note: Please keep AAT [AV PWR] and [AAT PWR] all have power on.

A way to test the AAT and Trace OSD without Video RX/TX

Posted by Tao at 9:35 PM

What different AAT III and IV


Bigger and more powerful
AAT III: One pitch servo
AAT IV: Dual pitch servos


Posted by Tao at 9:33 PM

Skylark AAT Compass Calibration

1. Connect 3S battery with AAT [PWR] port
2. Toggle Switch2 from [ON] to [OFF]
3. Wait 3 second, the AAT will start rotating
4. Wait about 30 sencond, the AAT will stop rotating
5. Toggle Switch2 forn [OFF] to [ON]
6. The calibration end
Posted by Tao at 9:31 PM

Skylark AAT Advanced Calibration

1、Fix AAT to a tripod 
2、Connect all FPV equipment(AAT/OSD/TX/RX)
3、Power on all FPV equipment
4、Wait Trace OSD locking [Home] position.
5、Move your airplane to >50meters from the AAT.
6、Toggle Switch3 from [ON] to [OFF]

7、Rotate the AAT to aim your airplane with hand
8、Toggle Switch3 from [OFF] to [ON]

9、The calibration end.
Note: Step 6/7/8 must be finished within 2 minutes, otherwise, the calibration request will expire. 
Posted by Tao at 9:27 PM
Newer Posts Older Posts Home
Subscribe to: Posts (Atom)

Blog Archive

  • ►  2013 (3)
    • ►  October (3)
  • ▼  2011 (29)
    • ▼  October (28)
      • AAT convert module for other brand OSD
      • Skylark Tiny OSD new connection diagram
      • Skylark Rock OSD
      • Skylark Trace OSD Handware version
      • Skylark 1000cd/m2 Ground Station
      • A quick way to test Tiny OSD
      • Skylark Tiny OSD
      • Tiny OSD NTSC or PAL
      • Skylark Tiny OSD firmware V2.9
      • Decided to try the direct approach.
      • Review and testing the Tiny III OSD from wippo76
      • Hooking up the Tiny OSD lll from Randy Luna
      • if the current sensor will read the 2s to show vol...
      • About ground loop.
      • Skylark OSD Distance
      • Skylark Tiny OSD RSSI with the spektrum receiver.
      • A secret in Skylark Tiny OSD
      • How to calibrate Digital RSSI
      • Skylark Tiny OSD RSSI Calibration
      • Skylark New Current Sensor
      • Skylark Dianmu OSD RSSI pin
      • xRotor Spider Quad frame with Skylark Tiny OSD
      • TX GND pin/Camera GND pin/OSD GND pin are connecte...
      • OSD standard screen degree layout for direction home
      • Skylark AAT Test Tool
      • What different AAT III and IV
      • Skylark AAT Compass Calibration
      • Skylark AAT Advanced Calibration
    • ►  September (1)
Picture Window theme. Powered by Blogger.